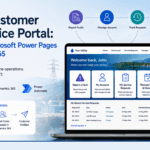
Customer service is one of the most operationally intensive functions in a utility company and one of the most scrutinised by regulators. Call centres handle hundreds of fault reports, account enquiries, and connection requests every day, each requiring manual data entry, cross-referencing with field systems, and follow-up communications. At the same time, customers increasingly expect the same digital self-service experience from their utility that they get from their bank or e-commerce provider.
A well-designed customer self-service portal changes both sides of this equation. Customers can report faults, track their service request, manage their account, and receive automated outage notifications — without calling your contact centre. Meanwhile, your operational staff see every customer interaction directly in Dynamics 365, with no data rekeying and no information silos.
Microsoft Power Pages, integrated with Dynamics 365 and Olix365’s utility configuration, makes this portal achievable within weeks rather than months.
What This Guide Covers: Building a utility customer self-service portal with Microsoft Power Pages – architecture, fault reporting, account management, security configuration, and outage notifications.
Portal Architecture: Power Pages and Dynamics 365
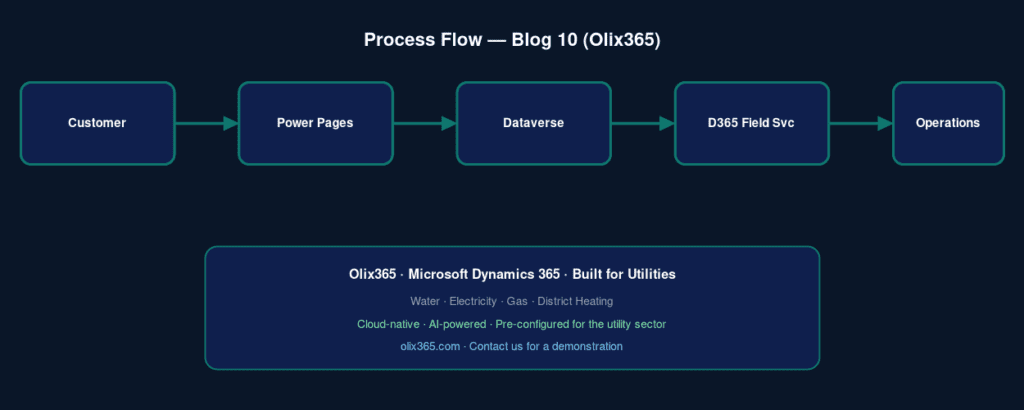
The customer portal is built on three components:
Microsoft Power Pages – the front-end web portal framework. Power Pages provides a no-code/low-code portal builder, hosting on Microsoft Azure, and native integration with Dataverse (the data layer shared with Dynamics 365).
Dataverse – the shared data platform. Customer accounts, service requests, work orders, and communication history are stored in Dataverse and accessible to both the portal and Dynamics 365.
Power Automate – the automation layer. Workflows triggered by portal submissions send confirmation emails, create work orders in Field Service, and send status notifications to customers.
When a customer submits a fault report on the portal, the data lands directly in Dataverse as a service request record, visible to your operations team in Dynamics 365 Field Service within seconds. No manual re-entry. No email to lose.
Step 1: Set Up the Power Pages Site
- In the Power Platform Admin Center, navigate to Environments → [Your Environment] → Power Pages Sites → New Site.
- Select the Customer Self-Service template as a starting point.
- Configure your site name, domain, and branding.
- Enable Azure Active Directory B2C or Microsoft’s built-in portal identity provider for customer authentication.
Step 2: Build the Fault Reporting Module
The fault reporting module is the highest-value feature for most utilities.
Create a Basic Form linked to the Service Request (Case) table in Dataverse:
- In Power Pages Studio, navigate to Forms → New Form.
- Select the Case table and choose the fields to expose: Fault Type, Description, Affected Address, Photo Attachment, Contact Details.
- Configure table permissions so customers can create new case records but only view their own cases.
- Set a Power Automate trigger on form submission to:
- Send an acknowledgement email.
- Create a work order in Dynamics 365 Field Service when appropriate.
- Notify operations for emergency-priority faults.
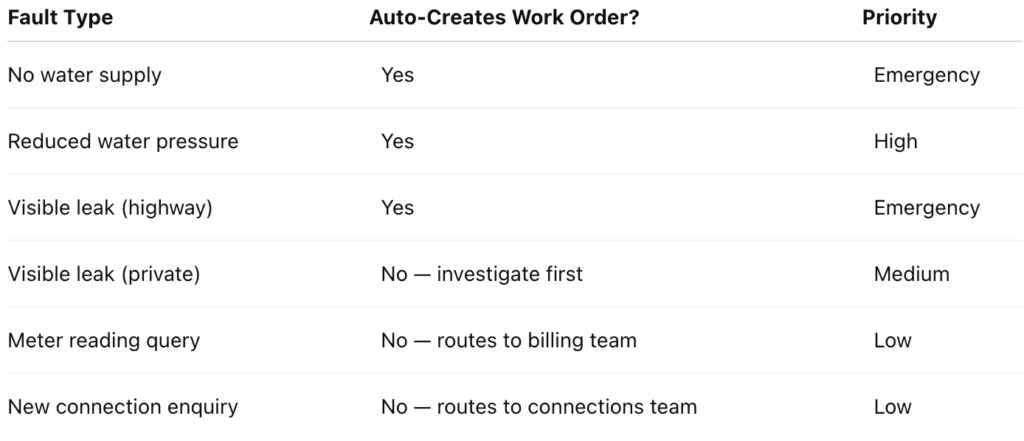
Fault Type Configuration
Step 3: Build the Account and Service History Module
Customers want to see their own service history without calling your contact centre.
- My Service Requests list — table view of all cases submitted by the customer.
- Case detail page — read-only view showing status, technician, estimated resolution date, and notes.
- Appointment scheduling — integrates with Dynamics 365 Field Service schedule board.
- Document downloads — certificates, test results, and correspondence available for self-service download.
Step 4: Build the Outage and Planned Works Map
A publicly accessible outage map is one of the most effective tools for reducing inbound contact volumes during incidents.
- Create a public Power Pages page with a Bing Maps control.
- Display active outage polygons from GIS or Dataverse.
- Display planned works with affected postcode sectors and schedules.
- Include a postcode checker for affected-area validation.
This feature typically reduces inbound calls during incidents by 40–60%.
Step 5: Configure Security and Compliance
Portal security is non-negotiable.
- Configure Table Permissions on every Dataverse table.
- Verify HTTPS enforcement and SSL configuration.
- Enable Rate limiting and CAPTCHA.
- Ensure GDPR/Privacy compliance.
- Conduct Penetration testing before go-live.
Step 6: Enable Automated Customer Communications
Power Automate powers proactive customer communications:
- Work order assigned
- Technician en route
- Job completed
- Planned outage notification
These automated communications can significantly reduce inbound customer enquiries while keeping customers informed.
Conclusion
A Microsoft Power Pages customer self-service portal connected to Olix365’s Dynamics 365 utility platform transforms the customer experience while reducing operational costs. Customers gain 24/7 access to account management, fault reporting, and real-time service tracking, while utility teams benefit from streamlined operations and automated workflows.
Frequently Asked Questions
How long does it take to build and launch a utility customer portal with Power Pages?
Typically 4–8 weeks using a pre-configured template, or 3–4 months for a fully bespoke implementation.
Can the portal be white-labelled with our utility's branding?
Yes. Power Pages provides full control over branding, design, and domain configuration.
Does the portal work on mobile devices?
Yes. Power Pages generates responsive websites that work across smartphones, tablets, and desktops.
How do customers authenticate on the portal?
Power Pages supports email/password authentication, social login, Azure AD, and SAML-based single sign-on.
Can the portal integrate with our existing billing and CIS platform?
Yes. Integration connectors can securely expose billing and account information through the portal.
How does the portal handle third-party fault reports?
Forms can be configured to allow reporting for addresses outside the customer's account, particularly for emergency faults.